To Light or Not To Light: The Art of Rock Photography with Chris Patmore
One of the best things about photography is your ability to specialise. To pick something that you love and take photos of it, whether it’s sports, landscapes, trains, people or really whatever it is that catches your eye
In the ’70s and early ’80s, Chris Patmore was an itinerant surfer in Australia, shooting perfect waves with much better surfers than himself on them was his thing.
He had also started photographing his other love, which was live music. However, his gipsy blood got the better of him and, bailing out of art school, He went travelling through Asia, eventually ending up in London, then Milan, and London again. Chris pursued other career paths, as a graphic designer, journalist and author, with photography being relegated to being more of a ‘hobby’.
Fast forward a couple of decades and his love for photography and live music was rekindled, and he began spending an inordinate amount of time in noisy, badly lit rooms around London. Here, Chris spills the beans on his experiences of shooting rock photography with a clutch of top tips for anyone considering becoming the next Mick Rock, or Gered Mankowitz
Within the world of live music photography, there are two distinctive groups, [although there are possibly more overlapping ones]. There is ‘concert photography‘, which happens at venues of over, say, 500 capacity. Here, there are famous bands, elaborate lighting and photo pits requiring photo passes, with the classic ‘first three songs, no flash’ rule, and possibly other contractual restrictions.
Then there is ‘gig photography‘, which is basically turning up at a pub, camera in hand, and being pressed up against the ‘stage’ with every other punter out to see unknown and up-and-coming bands.
It’s in these latter situations that photographic skills are really put to the test; dealing with low light, which is often just red or blue LEDs, or constantly changing light levels, with the performers moving in and out it.
On top of that, you have the constant issue of contending with the punters, who may be [and quite often are] drunk and keen to mosh. The trade-off, though, is that you are able to shoot as you wish, free from the ‘first three songs’ rule. However, the ‘no flash, rule usually stands, [although never enforced] it is more of a courtesy to the musicians, and any other photographers present.
Although the origins of the ‘three songs, no flash’ have long been lost in the dry-ice mists of time, it was definitely instigated by a performer with enough clout to demand it, because he [allegedly ‘The Boss’] was fed up being blinded by the light from the press pit.
Back in those days, photographers were working with film of a maximum 400 ASA [usually pushed to 800 or 1600 if needed] so using a flash was a necessity. Nowadays, shooting at 3200 ISO is considered a safe starting point, 6400 and beyond is seen as perfectly acceptable. So there is no real need to use a flash, except if you need to counteract the red light [or whatever single, sensor-blasting colour is dialled in] because your editor doesn’t want to run black-and-white photos.
Now here’s the issue that long preamble raises. A lot of the photographers that opt to use a flash at a gig, don’t really know how to use them, and, I suspect how to make the most of available light.
Shooting bounce flash would be perfectly acceptable if the venue ceilings weren’t painted black, or extremely high, or both
Overlooking the annoyance factor for the musicians, and the other photographers who choose to shoot by the existing light, there is the fact that the resulting flash photos lack atmosphere.
Invariably, what I have observed when flash is used, it is a Speedlight mounted on the camera’s hotshoe, usually in TTL auto mode, without a diffuser, with the flash head pointing straight up towards the ceiling, in bounce mode. I like to think they are doing this so as not to blast the stage and performers with a full-frontal burst of light. Shooting bounce flash would be perfectly acceptable if the venue ceilings weren’t painted black, or extremely high, or both.
It seems these photographers have read about, or have seen, flash used in bounce mode, without understanding the need for a surface for the light to reflect off. When the camera is in horizontal mode, it doesn’t do a lot of harm and will remove a fair amount of the colour cast from the LEDs. However, when they switch to portrait mode, they do not adjust the flash head so that it continues to attempt to bounce off the ceiling, instead, it blinds anyone to their right or left, and lights the far edge of the stage.

Dirty White Fever at The Old Blue Last, Shoreditch. When the venue lighting is challenging and unimaginative, rather than cracking out the flash to make a rather bland colour image that highlights the terrible stage setting, it is usually best to convert to black and white, to create a far more interesting shot.
What is the solution?
It is a rather delicate situation to correct at the time. Most people don’t like being told that what they are doing is wrong, especially when they consider themselves ‘professional’ because they have been commissioned by a magazine, even if it’s not a paid job. It is further complicated because a majority of the people using flash are female photographers, and as an older, white male telling a young, independent woman that the way she is working needs to be revised would be seen as rampant sexism or another case of the dreaded ‘mansplaining’.
Bearing all this in mind, here is a list of suggestions and solutions for shooting gigs under bad lighting conditions: Firstly, leaving the flash at home, or in your camera bag!
1. Talk to the person in charge of the lights. In small venues, it is usually the sound tech who gets lumbered with this job. They are usually only interested in making sure the band can be heard and the sound is mixed properly. Unless the band has asked for a very specific type of lighting, tell him or her what you need/want and they will usually oblige, as it will be one less thing for them to contend with, and it will make your life easier too.
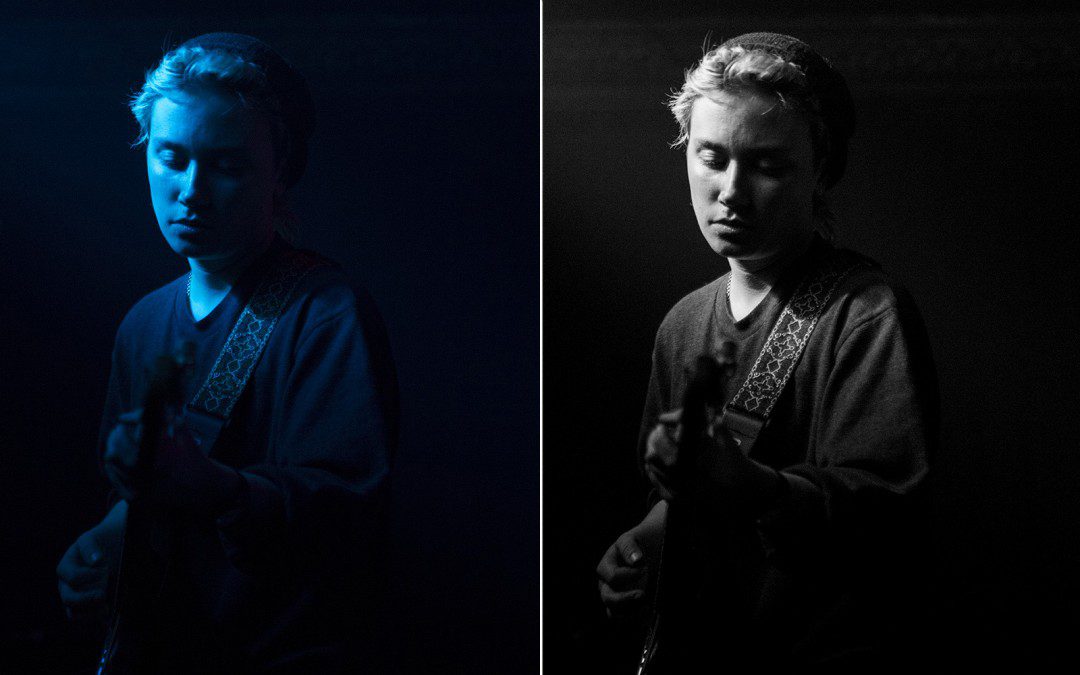
2. If you are stuck with just one colour, whether red, green or blue, make sure you are shooting in RAW format [always], then convert to black and white. If the light is monochrome, then makes sense for your final image to be monochrome. It is miraculous what you can rescue with RAW, but it will rarely equal a great B&W image, especially for music. In the days of film you would automatically use B&W film, so why not use the same thinking and methodology with digital cameras?

Bubblegum Screw at The Unicorn, Camden.
3. If the light is really low, crank up the ISO, there is rarely a situation that a decent camera can’t handle, and find a place where the light is best and aim your camera at the action there. If the light is really so bad that it is impossible for your camera to even focus, it possibly means that band don’t really want to be photographed, so pack up and go home, or simply enjoy the music.
However, if you have to deliver shots for an assignment, and it requires you to dig out the flash, here are some suggestions to get something better than glorified snapshots. Generally, all you really need is to light the performer, not the whole stage.
5. Instead of using a powerful flash, use a small LED camera light, such as the Lume Cube. As it is a constant light source it won’t startle the performers, and if the light intensity is kept relatively low they won’t even notice it [probably].
Annabel Allum at The Victoria, Dalston.
6. If you insist on using a flashgun, put a diffuser on it, even if it just a Stofen type. You won’t need to use one of those unwieldy softboxes or dome types. Use the flash in manual mode and dial the intensity down to 1/8 or lower, depending how close to the action you are. It will also speed up recycling time, and save on battery power. Now you can aim the flash directly at your subject [or tilt the flash head up, at the most, 45°] and only light the musician, leaving some of the stage lighting for atmosphere. If you are strong and dexterous enough, take the flash off the camera, utilising a remote trigger, [which can be picked up relatively cheaply now] and hold the flash in one hand and the camera in the other. You will get something a lot more interesting than with a camera mounted flash.
Take the flash off the camera, utilising a remote trigger and hold the flash in one hand and the camera in the other. You will get something a lot more interesting than with a camera mounted flash
These small venue gigs are the ideal place to experiment and learn your craft, and also take a more creative approach to framing shots that you will never get in the heat of the photo pit with the pressure of a three-song limit. And who knows, you may end up getting a unique, iconic shot of a superstar band of the future, instead of a shot indistinguishable from all the others shot from the pit of that arena concert. Remember, shoot iconic photographs rather just photographs of icons.
About the author